Why We Love This Tutorial:
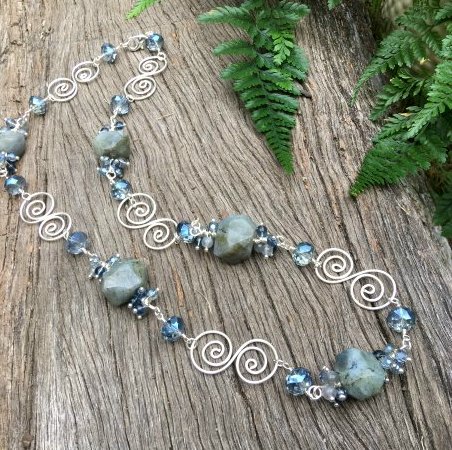
This is a class we teach once a year or so – we absolutely love the wire swirl design. If you are local we suggest coming along to the class – the swirl design is much easier to learn in person. Plus the class is always a lot of fun! But for those that are not local, this is still a project that is quite easy (once you get the hang of the swirls!), and can be completed quite quickly. The difference with this design here today is we have added some extra dangles that we don’t normally teach in class. We’ve used some of our stunning new Labradorite faceted nuggets (definitely limited availability on these! You may need to substitute these if we no longer have them in stock), mixed with some Blue Sheen glass crystals, glass rounds and some small Labradorite rounds.
As with all of our projects, you could use any colour combination you like with this design. We have just also got in some large Sunstone nuggets, which I could see going well with white freshwater pearls and our Apricot Crystals. So many ideas, so little time!!
Beads and Materials You’ll Need:
- Large Gemstone Nuggets (We’ve used Labradorite. These are limited stock so any large Labradorite would work!)
- 8x10mm Crystal Rondelles (we’ve used Blue Sheen)
- 4mm Round Crystals (we’ve used Blue Sheen)
- 4mm Glass Round Beads (we’ve used Iolite)
- 4mm Round Gemstone Beads (we’ve used 4mm Labradorite Round Beads)
- Ballpins (we’ve used Silver Ballpins)
- 4mm Jump Rings (we’ve used Silver jump rings)
- 18ga Wire (we’ve used silver wire)
- 24ga Wire (we’ve used silver wire)
- Clasp of your choice
Tools:
Method:
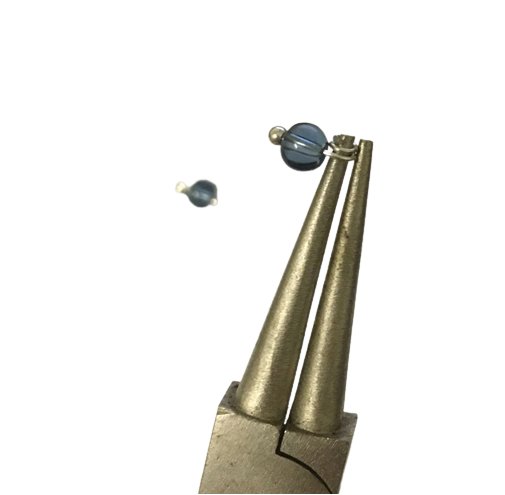
- Make all the dangles first (it’s best to get them done and out of the way!). We have used 6 dangles either side of each Labradorite (so 12 dangles per Labradorite bead). So that 60 dangles altogether. We have used a mixture of 4mm Labradorite, 4mm Iolite glass round beads and 4mm Blue Sheen crystals. We have used roughly the same amount of each type of bead, however when we have put them on the necklace we have selected them randomly. We have used the coil technique for making these dangles, which is a very easy way of creating dangles that are secure and can not fall of your design. In this technique, you simply coil the headpin around you round noose pliers. You need to use relatively short headpins (about 25mm) and you’ll wrap about 2-4 times.
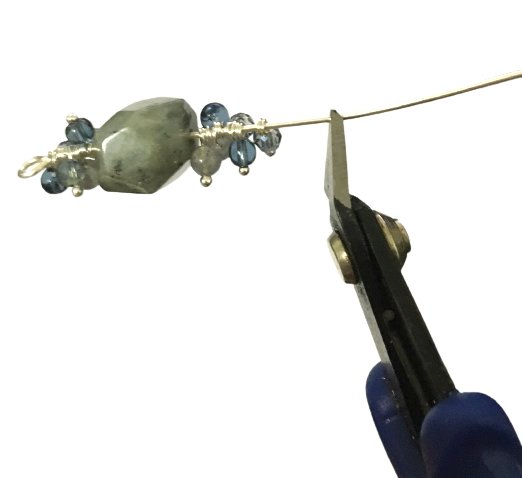
- Take you 18ga wire and cut five sections about 10cm long (you may have a little wastage but that’s better than not log enough!). Make a simple loop at one end using round nose pliers. Slide on 6 of your dangles, the Labradorite nugget, then 6 more dangles. Cut the remaining wire leaving about 1cm after the final dangle. Make another simple loop with you round nose pliers.

- Now it is time to make the swirls! Take about 15cm of 18ga wire, and start by forming a small loop at one end. Keep winding until you have made a swirl with about three levels. Do the same to the other side. Sometimes I will mark the center of the wire so that I know when to stop the first swirl. But it doesn’t really matter if each side of the swirl isn’t perfectly equal!
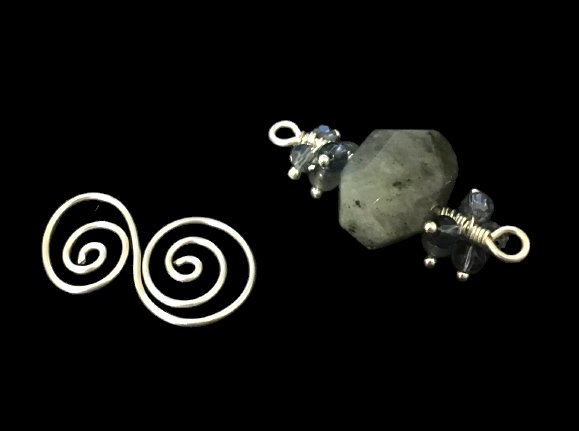
- Now make 12 simple wrapped connectors using your 8x10mm crystal rondelles, using 24ga wire. Take about 10cm of wire, make a wrapped loop on one side, slide on the bead, and finish with another wrapped loop.

- Now it’s the fun(est) part! Join all the components together using 4mm jump rings. I like to use jump rings as the necklace seems to fall a little better than if we joined the components directly. I have used a simple lobster clasp at the end, but you could use whatever type of clasp that is your preference.